The RV water heater anode rod plays an important role in protecting your tank. Inspecting and replacing it regularly is one of the easiest ways to extend the life of your water heater. In this guide, we’ll show you how to replace the anode rod in your RV water heater, with a step-by-step walkthrough from Chris Locati, a certified RV technician and RV inspector based in Hillsboro, Oregon, who serves the Portland area and throughout the Pacific Northwest.
Once you've completed the replacement, you can log it in the RV Help app's free maintenance tracker and set a reminder for your next inspection so you never forget this important task.
Read our Complete Guide to RV Water Heater Maintenance to learn how to perform other routine maintenance tasks on both tank-style and tankless RV water heaters.
What is an Anode Rod?
A sacrificial anode rod is a removable metal rod inside an RV water heater that corrodes instead of the inside of the water heater's steel tank. By taking the damage itself, it prevents rust and extends the life of the tank. Without it, the tank could fail much sooner and require a costly replacement.
Do All RV Water Heaters Have an Anode Rod?
No. Only water heaters with a steel tank such use an anode rod. This includes Suburban brand water heaters. Atwood/Dometic water heaters use aluminum tanks and a plastic drain plug instead, so they do not need or use an anode rod.
Why the Anode Rod Matters in RV Water Heater Maintenance
Inside a Suburban water heater, the tank is made of steel with a porcelain lining. Over time, heat and minerals in water create corrosion. The anode rod, usually made of magnesium or aluminum, corrodes first, “sacrificing” itself to protect the tank.
If you neglect this part, the tank itself will rust out, leading to leaks and an expensive replacement. Checking the RV water heater anode rod regularly is one of the cheapest and easiest ways to protect your RV’s plumbing system.
How Often Should You Replace an RV Water Heater Anode Rod?
Inspect the anode rod at least once a year, or at least twice per year if you live in your RV full time. Replace it when it’s 50–75% worn down, if the steel core is visible, or if your RV water smells like rotten eggs. If you RV full-time or in areas with hard water, you may need to replace it every 6 months.
Are All RV Water Heater Anode Rods the Same Size?
Most Suburban RV anode rods are about 9–9.25 inches long and use standard 3/4" NPT threads, so they’re interchangeable across Suburban models. The main difference is in materials:
Magnesium rods (most common) offer the best protection.
Aluminum or zinc/aluminum rods last longer in hard water and can reduce odor.
Tools and Supplies for RV Anode Rod Replacement
Here's what you'll need to replace the anode rod in a Suburban RV water heater:
1-1/16" socket and ratchet (required size for Suburban RV anode rods)
PTFE (Teflon) thread tape
Replacement Suburban anode rod (magnesium recommended; aluminum/zinc for hard water or odor problems)
Garden hose + flushing wand (for sediment removal)
Bucket or large pan, shop towels, gloves, safety glasses
Safety First
Before you remove the anode rod in your RV water heater, always:
Turn off propane and electric to the heater.
Let the tank cool completely.
Shut off water supply and pump.
Drain the water heater or relieve pressure.
Stand to the side when removing the rod—water will gush out.
How to Replace an Anode Rod in an RV Water Heater
Step 1: Make Sure Your Water Heater Has an Anode Rod.
Suburban water heaters use anode rods; Atwood/Dometic models do not. Look for “Suburban” on the label and a hexagon-shaped anode/drain plug at the bottom center.
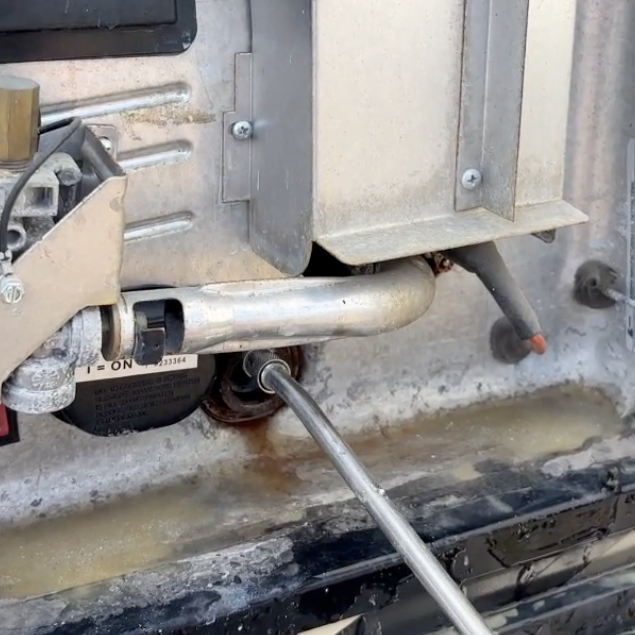
Step 2: Turn Off the Water Heater.
Locate the switch and make sure it is turned off.
Step 3: Drain and Cool the Tank.
If your RV has a hot water release valve, open it to drain the tank onto the ground under your RV. If your RV doesn't have this, you can instead just open a hot water faucet inside the RV. The water supply to the tank must be switched off in order for the tank to empty.
The tank is insulated and will take several hours to cool completely on its own, but if you drain the tank in the evening and leave it turned off it will be completely cool by the next day.
A faster alternative (though it uses more water) is to leave your water supply switched on while draining the tank, and when the water draining out feels cool you will know the tank is cool. At this point, shut off the water supply and let the tank finish draining.
Note: Some water will remain in the bottom of the tank and gush out when you remove the anode rod.
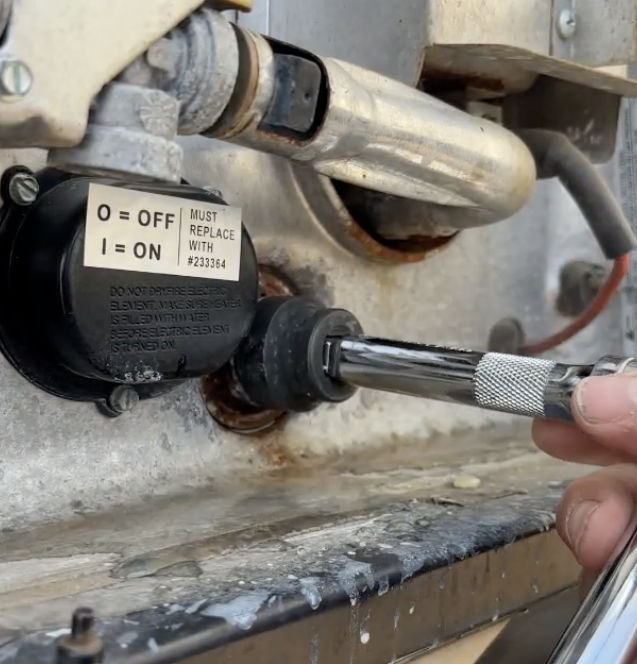
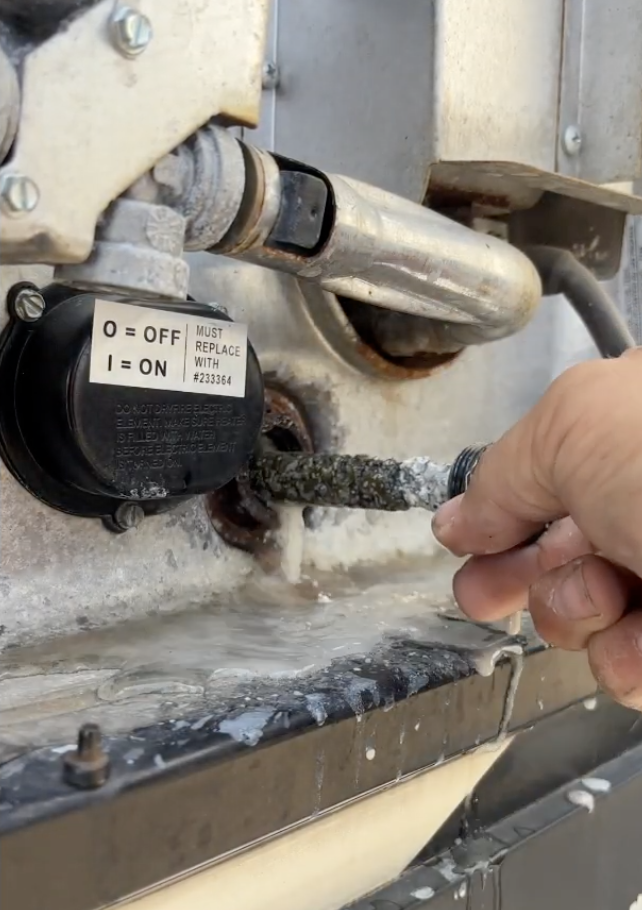
Step 4: Remove the Old Anode Rod
Place a bucket beneath the opening to catch water that flows out. Use a 1-1/16 inch socket to loosen the anode rod, then pull it out. Expect a surge of water as the tank completely drains.
Step 5: Flush Sediment from the Tank
Let the water drain fully, then use a flushing wand with a garden hose to clear out mineral deposits, rinsing the inside of the tank until the water runs out clear and free of debris. This is a key part of RV water heater maintenance that improves efficiency and prevents odors.
Step 6: Inspect the Anode Rod
Check the rod you removed:
Replace if more than 50–75% consumed.
Replace if the steel core wire is showing.
If there’s plenty left, it can go back in temporarily.
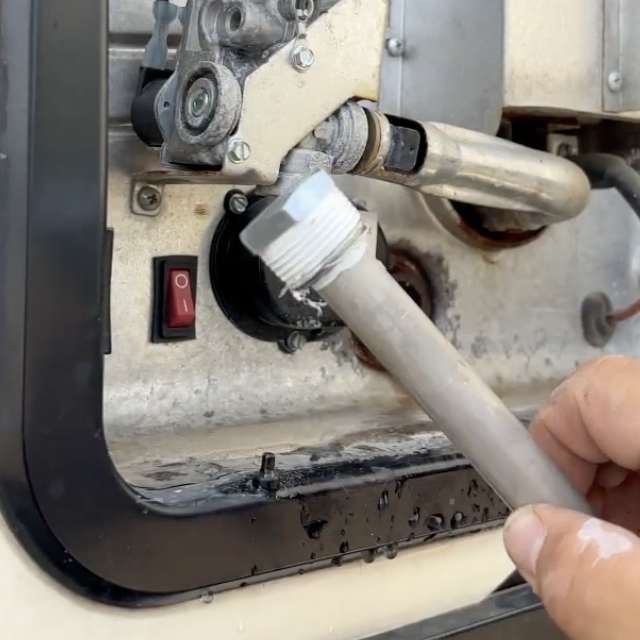
Step 7: Prepare the New Anode Rod
Wrap the threads with PTFE (Teflon) tape—2 to 3 clockwise wraps—to prevent leaks and make removal easier next time. Note: Some anode rods come with tape already wrapped around the threads.
Step 8: Install the New Anode Rod
Thread it in by hand first to avoid cross-threading, then snug with the socket. Don’t overtighten—the goal is snug, not stripped.
Step 9: Refill and Check for Leaks
Leaving the P&T valve open (but with any faucets closed), turn water supply back on. Keep an eye on the anode rod, and if you notice any leaks, you'll need to tighten it more. When water starts dripping from the P&T valve, you'll know the tank is nearly full and you can close the valve.
Step 10: Restore Power and Test
Once full and leak-free, you can switch the power back on to heat the water inside the tank.
Optional: Vinegar Soak for Heavy Buildup
If you notice heavy calcium or mineral deposits inside your RV water heater, a vinegar soak can help dissolve the scale. We would especially recommend doing this if you are the new owner of a used RV and don't know how well the water heater has been maintained.
The method is simple: fill the tank with plain white vinegar, let it sit for 8–12 hours, then drain and flush thoroughly before putting the heater back into service. Todd Henson of the National RV Training Academy explains how to put vinegar into the tank in his video on sanitizing your RV water heater.
Track Anode Rod Replacements in the RV Help App
Remembering when you last inspected or replaced your anode rod can be tricky, especially if you only check it once or twice a year. The RV Help app's free maintenance tracker lets you log the date of each replacement and set custom reminders for your next inspection—whether that's annually, semi-annually, or on your own schedule based on water quality.
The app also includes step-by-step instructions for this and other water heater maintenance tasks, so you'll always have guidance when you need it. And if you need to reference your water heater's model number or warranty information while working, you can store those details in the app's virtual glovebox for quick access.
Keep Your Water Heater Protected
Checking and replacing the RV water heater anode rod is simple but important RV water heater maintenance task that costly tank failure and helps ensure you always have clean hot water on the road.
If the job seems too messy, time-consuming, or intimidating, many mobile RV technicians offer seasonal water heater services—including flushing and anode rod replacement—which you can easily book through RV Help.
Ready to stay on top of your water heater maintenance? Download the RV Help app for iOS or Android to track anode rod replacements, set inspection reminders, and access step-by-step instructions for all your RV maintenance needs.
FREE RV Maintenance Checklist Spreadsheet
A printable and editable spreadsheet to help you stay on top of RV maintenance tasks. Organized by frequency, with space to add notes and track completion dates, so you can keep your RV in top condition year-round.
By submitting this form, you'll receive our newsletter and the free download. You can unsubscribe at any time.