![Free RV Inspection Checklist: Buying Guide for Used RV Shoppers [PDF Download]](https://rvhelp-prod.s3.us-east-1.amazonaws.com/article-images/article-1750457299635)
As exciting it can be to shop for a used RV, it can be equally stressful. There are a lot of decisions to make from type of RV to budget and insurance. However one area many people shopping for a used RV find most overwhelming is inspecting the RV. That’s why we created our RV inspection checklist PDF. It’s a simple RV buying checklist to help you, the buyer, spot red flags early, whether you’re perusing a used RV lot or meeting with a private seller.
This list is not a suitable replacement for a professional RV inspection, which we always recommend, but it’s a great starting point that can help you spot issues in used RVs and narrow down your choice.
Want a printable version? Scroll to the bottom of this article to print and take it with you when you’re out shopping for your used RV. This checklist for buying an RV will help you stay organized and avoid costly mistakes. After you’ve narrowed down your choices and feel ready to take the next steps, don’t forget to use RVHelp.com to find a professional inspector in your area before you pull the trigger on your purchase!
What is an RV Inspection Checklist For?
Our RV inspection checklist PDF is designed to help you do a basic evaluation when touring a used RV. Whether you’re walking through a dealership lot, meeting a private seller, or even touring an RV virtually on a video call, this checklist is your go-to guide to avoid making big mistakes—mistakes that can lead to expensive repairs and serious buyer’s remorse. Think of it as your tool for narrowing down options, spotting red flags early, and getting a clearer picture of whether an RV is worth pursuing further.
This RV buying checklist doesn’t replace a comprehensive RV inspection done by a professional, but it is a smart first step. We encourage you to bring a flashlight, wear clothes you don’t mind getting a little dirty, and take notes or photos as you go. That way, you can keep track of what you’re seeing, especially if you're comparing multiple units.
And remember: before making any final decision or handing over money, it’s crucial to hire a certified RV inspector. All of the RV inspectors listed on RV Help are certified through the National RV Inspectors Association (NRVIA), ensuring the highest standards of quality, detail, and professionalism.
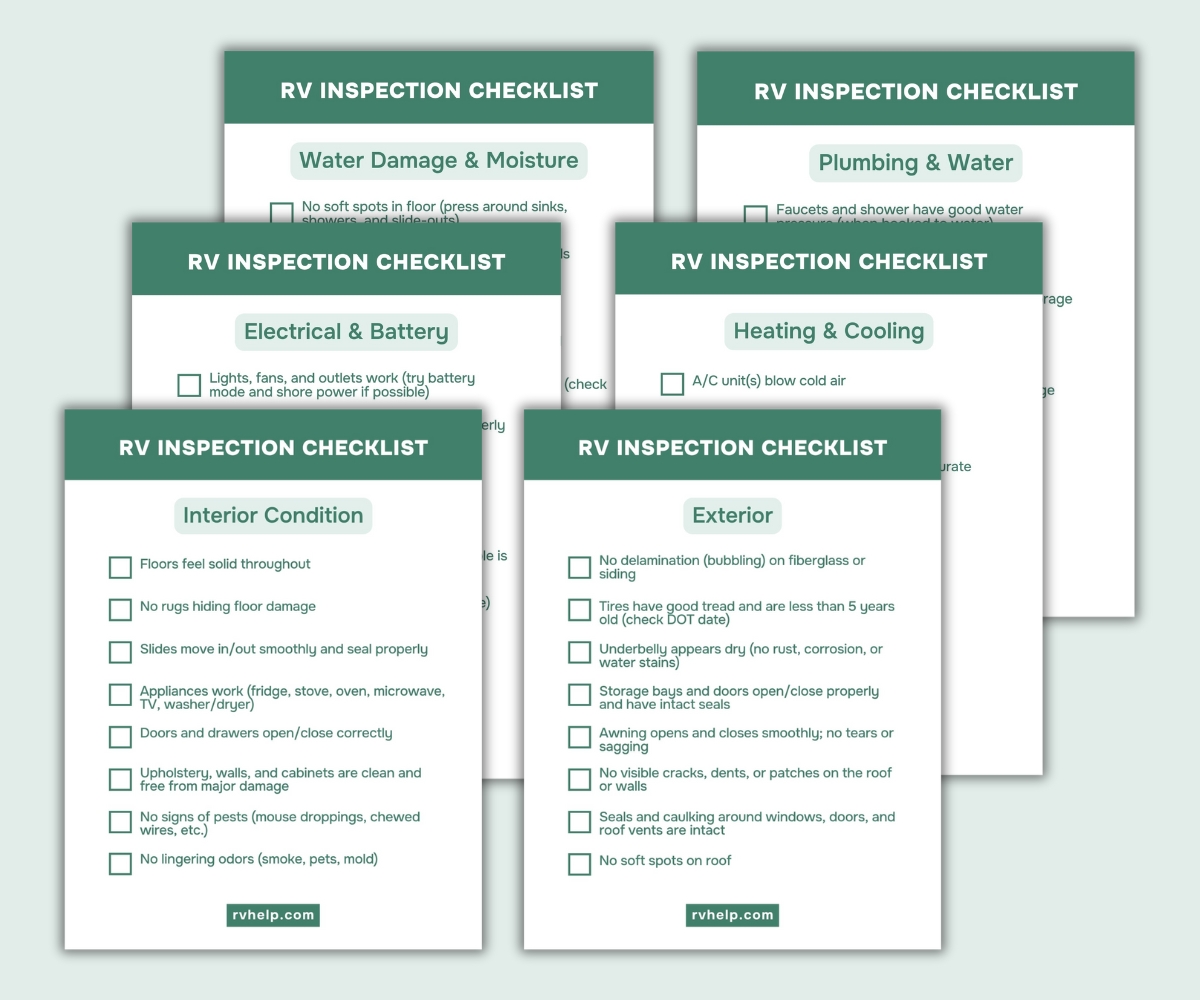
RV Inspection Checklist
There are a lot of different components when it comes to inspecting a used RV, and especially if you’re a first-time buyer, you may have no idea what to look for. What to inspect will also vary depending on the type of rig you’re considering—a camper van has fewer systems than a Class A motorhome, but both require a careful look. This checklist for buying an RV helps you know what matters, why it matters, and what warning signs to keep an eye out for.
Exterior
The exterior is your first impression and a key place to look for signs of age, wear, and potential future damage. Look closely for:
No delamination (bubbling) on fiberglass or siding — bubbling can indicate water intrusion or structural damage.
No visible cracks, dents, or patches on the roof or walls — these can mean past accidents or poor repairs.
Seals and caulking around windows, doors, and roof vents are intact — cracked sealant means a higher chance of leaks.
Awning opens and closes smoothly; no tears or sagging — replacing an awning can be costly.
Storage bays and doors open/close properly and have intact seals — water or critters can get in through broken seals.
Underbelly appears dry (no rust, corrosion, or water stains) — rust can signify frame damage.
No soft spots on roof or walking surface — this usually means water damage.
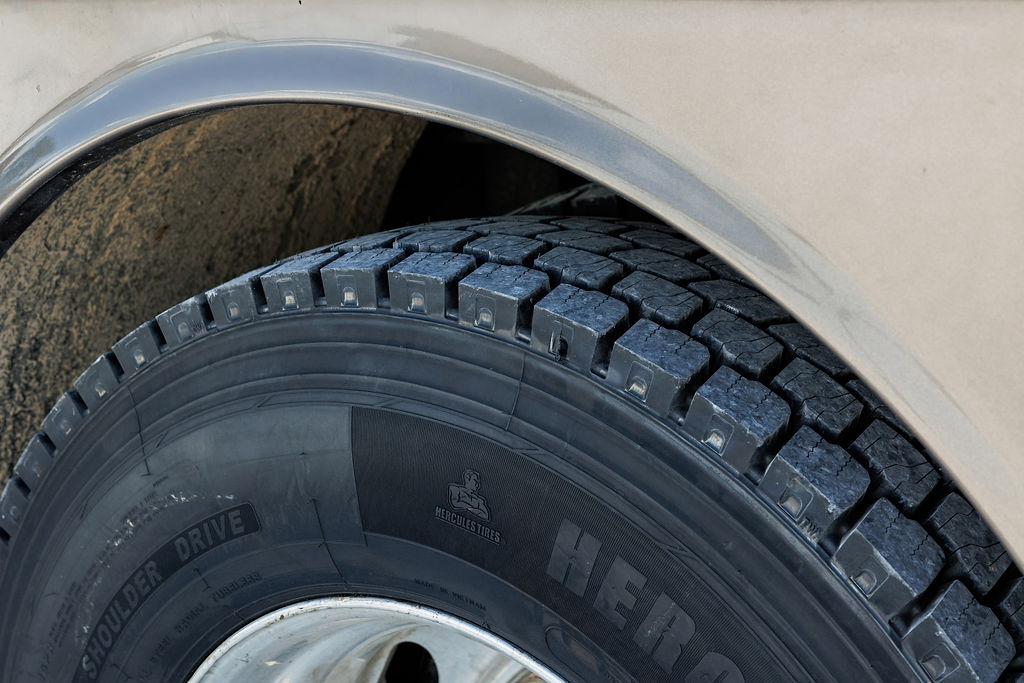
Tires have good tread and are less than 5 years old (check DOT date) — old tires are unsafe and costly to replace.
Water Damage and Moisture
This is always a scary topic for RV owners and shoppers alike, but with a little diligence, you can usually spot major red flags. Water is one of the most expensive problems to fix in an RV, so this step is crucial:
Press down in areas around sinks, showers, and slide-outs to check for soft flooring.
Look at ceilings and walls for any staining or bubbling — classic water damage signs.
Musty smells or mildew = moisture lurking somewhere.
Ceiling panels should lie flat with no discoloration.
Cabinet corners and under beds feel dry (check with hand or moisture meter)
If you do notice signs of water damage, look for an obvious cause. In one example, an RV owner had accidentally left a gallon of distilled water in a bathroom cabinet that burst in cold weather. The damage in that case was restricted to a small, easily repairable area and did not indicate a bigger problem.
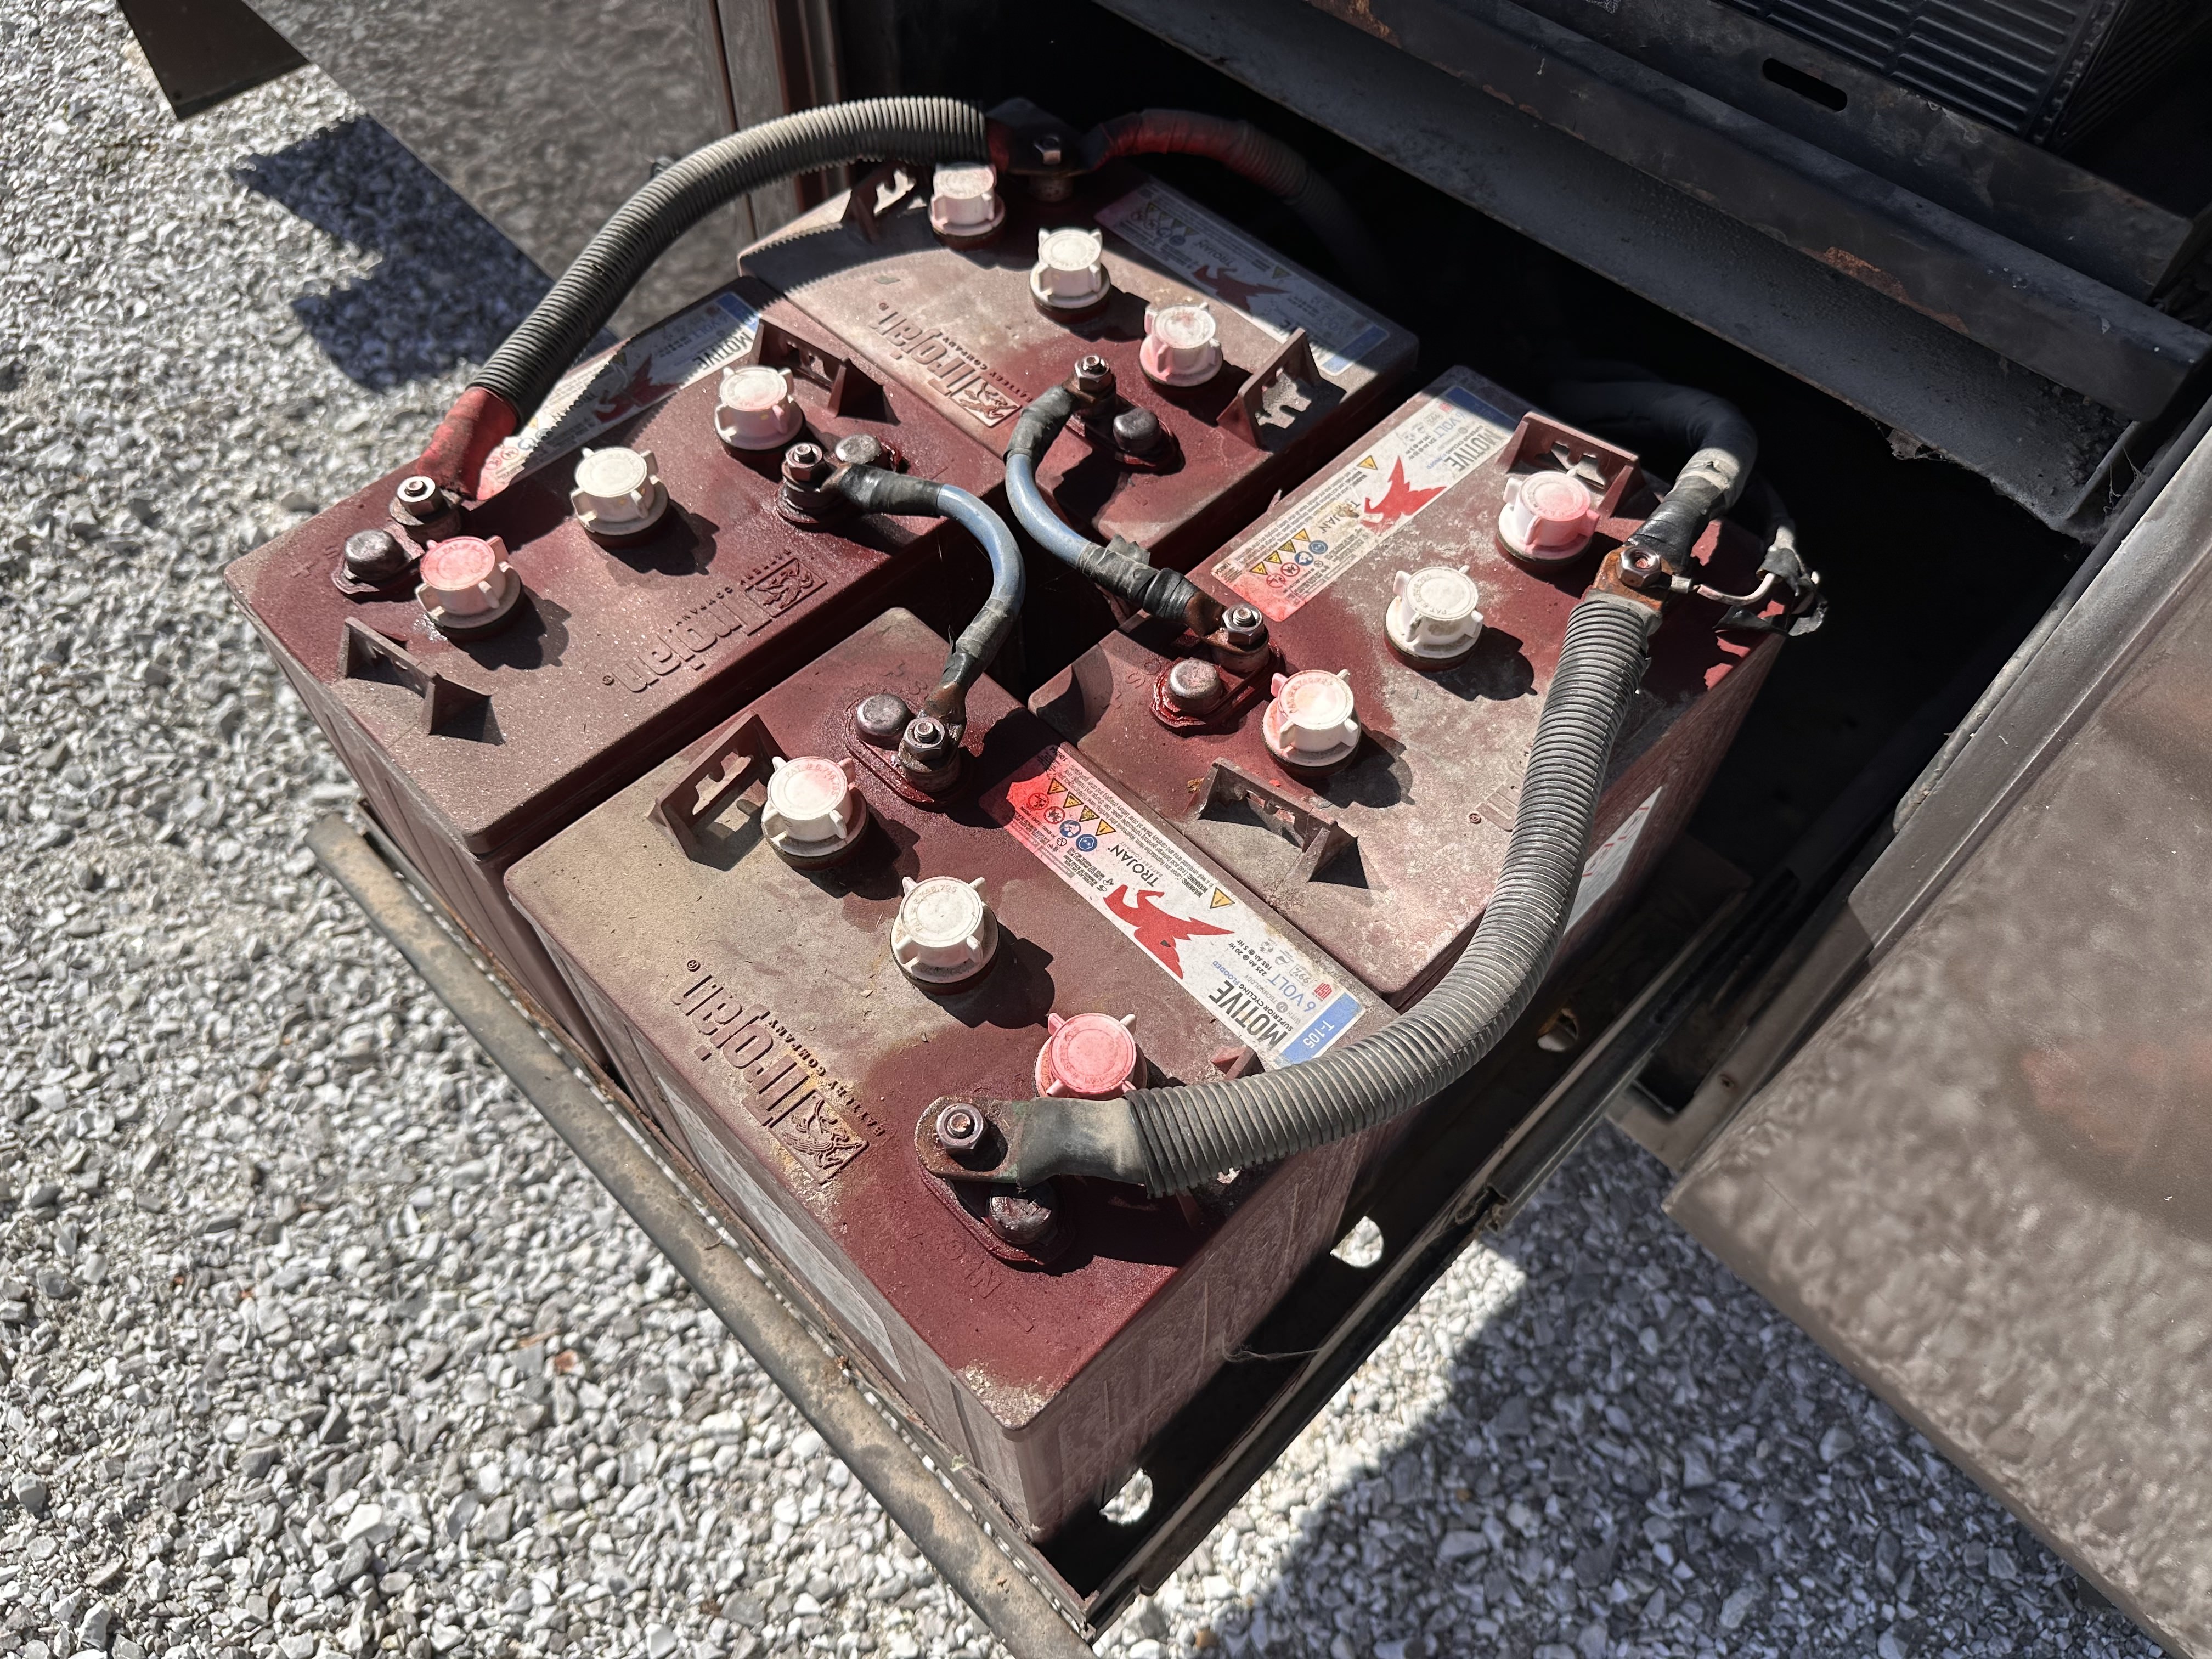
Electrical and Battery
This is something you might have to ask to test, especially if the RV is on a lot. If the dealership or seller is serious about selling it to you, they’ll show you how everything works (or doesn't.)
Lights, fans, and outlets work (try battery mode and shore power if possible)
Batteries are clean, no corrosion, and properly connected
Control panel turns on and responds
Test generator, inverter, and solar panel system (if applicable)
Check shore power plug and cord for fraying or burn marks.
Plumbing and Water Systems
Yet again, this is something you’ll want to check and can request to be hooked up to water to demonstrate the use. Even if everything was working the last time the seller used the RV, pipes and hoses could have later burst in cold weather or come loose during travel.
Faucets and shower have good water pressure (hooked to water)
Water pump turns on and runs properly
No leaks under sinks or around toilet
Make sure toilet flushes and seals correctly
Check tanks (fresh, gray, black) for signs of leaks or damage
Heating and Cooling
Heating and cooling is very important—just ask any RVer that has traveled to harsh climates! The last thing you want to discover is that your A/C doesn’t work after you’ve pulled into your Arizona campsite.
A/C unit(s) blow cold air
Furnace ignites and heats properly
Thermostat responds and displays accurate temp
Check ductwork (if visible) for blockages or damage
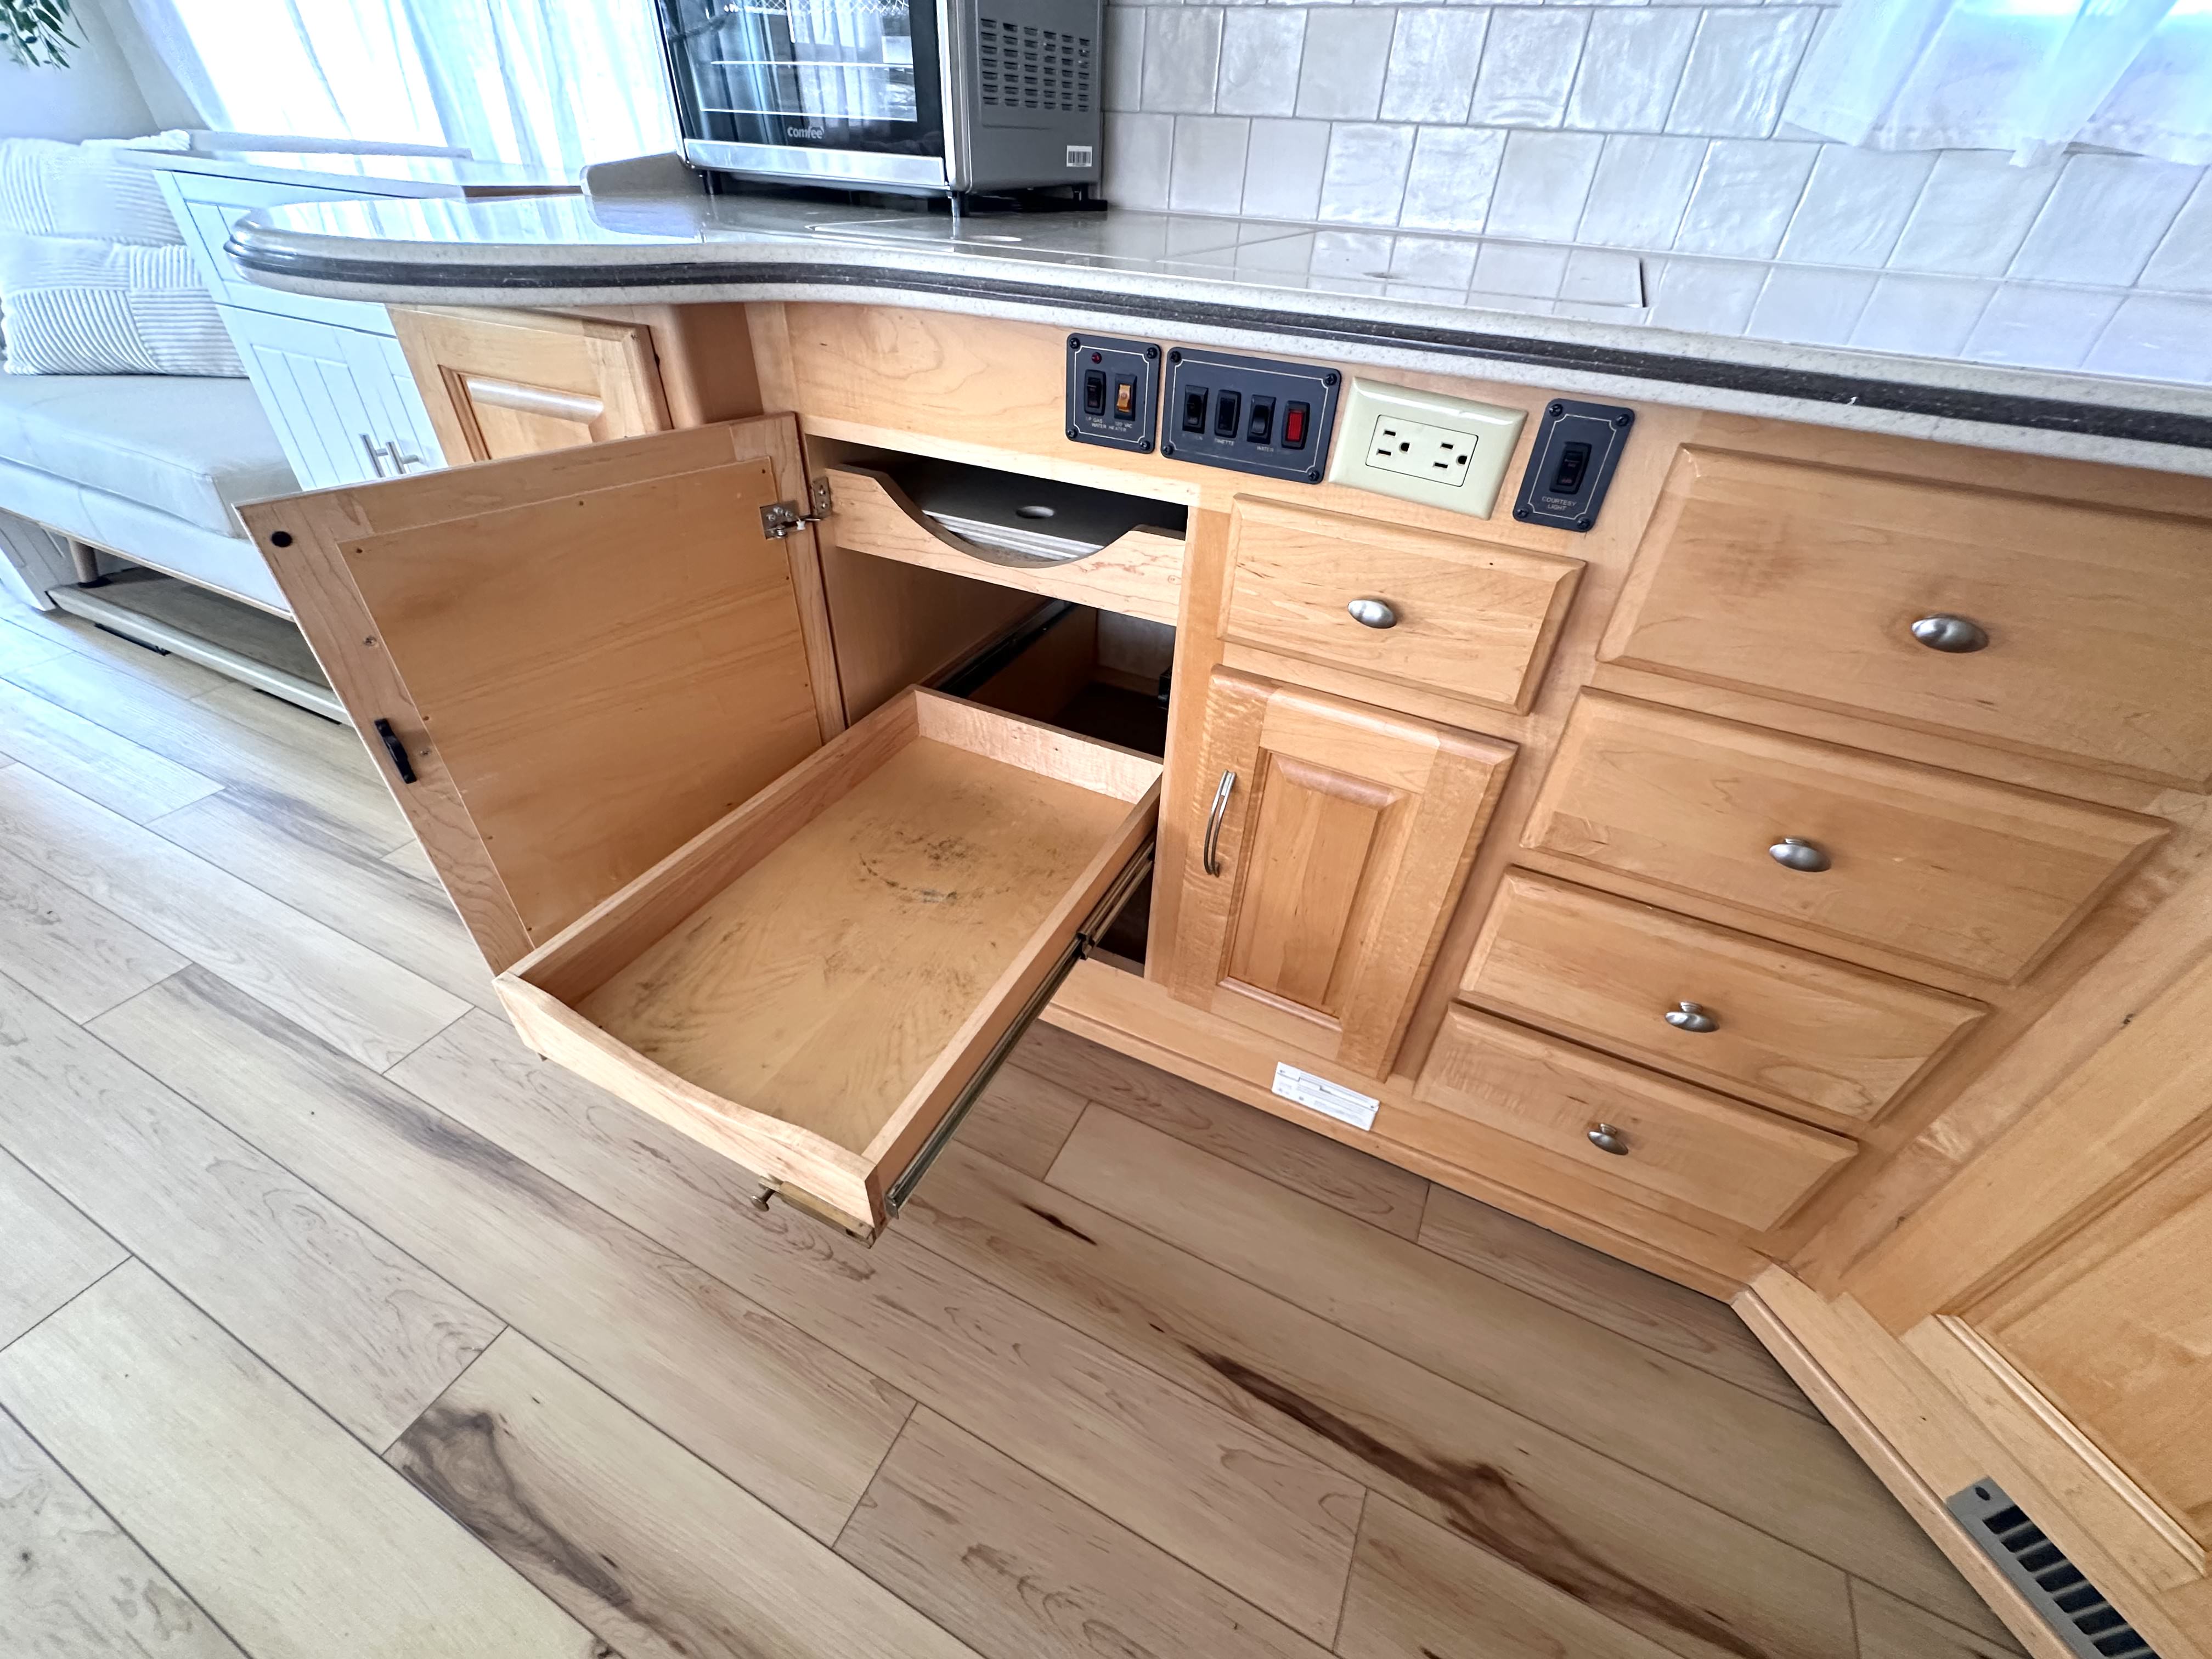
Interior Condition
This is different than if you like the interior. Even if you plan on remodeling the inside of an RV, you want to make sure you’re working with a solid foundation.
Walk the entire floor to feel for dips, creaks, or soft spots.
Slide-outs should move in/out without unusual noise or resistance, and seal fully.
Turn on every appliance to see if they power on (fridge, stove, oven, microwave).
Open every drawer and cabinet — they should latch and stay closed.
Look for torn upholstery, scratched cabinetry, or damage that hints at past leaks.
Keep an eye out for mouse droppings or signs of pests.
(For Motorhomes) Chassis and Driving Components
If you’re looking at a motorhome, you’ll want to inspect the engine, just like you would a car that you’re looking at buying.
Engine should start on the first or second try and idle smoothly.
Check underneath for signs of leaks (oil, coolant, brake fluid).
Tires should wear evenly (uneven wear = alignment or suspension issues).
Brakes should feel responsive, no grinding or pulling.
All dash controls and gauges should function.
Go on a short test drive and pay attention to odd noises, vibrations, or warning lights.
Final Considerations (Title, Maintenance Records, Seller Transparency)
These might not be top of mind when doing a first look, but they are very important and should be considered when narrowing down your search.
Ask if the seller has maintenance logs or service receipts.
Make sure the title is clean and matches the VIN.
Ask questions and pay attention to how the seller answers. Transparency goes a long way.
If it smells like smoke, mold, or pets, know that odors are hard (and expensive) to remove.
Why You Still Need a Professional Inspection
Even the most detailed personal checklist can’t catch everything (and we recognize how overwhelming it can be if you’re not sure about what to really look for). Professional RV inspectors, especially NRVIA-certified ones, spend 6 to 9 hours examining a rig and an additional 3 to 6 hours writing up a detailed report. They look for things most buyers aren’t sure how to find—like subtle signs of water intrusion, delaminated underlayers, or aging appliances on their last legs.
For example, an inspector may notice a hairline crack in the roof sealant that looks like nothing now but could lead to serious water damage next rainy season. A small catch like that could save you thousands in repairs. That’s the value of a trained eye!
Before you make any final decision, use RVHelp.com to find a certified NRVIA inspector near you.
Download and Print Our Free RV Inspection Checklist PDF
We’ve compiled all of these categories into one easy-to-use printable checklist so you can bring it with you on your RV shopping trips. Whether you’re walking a dealer lot or checking out a private sale, this will help you take notes, compare units, and stay organized.
Scroll to the bottom of the article to download your free RV Buying Checklist and take it with you on your next RV shopping trip.
Final Thoughts
Shopping for a used RV can feel overwhelming, but our RV Inspection Checklist was created to make the process more manageable and empowering. It helps you spot red flags early, compare your options more clearly, and feel more confident in your choice.
Whether you're brand new to RV shopping or you've been browsing for a while, having a detailed checklist for buying an RV ensures you won’t overlook important details. From water damage to electrical systems, this guide helps you inspect with confidence.
But remember that this RV buying checklist is just a first step! A professional RV inspection is still your best protection against hidden problems.
Download your free RV Inspection Checklist PDF, then download the RV Help mobile app to make it easy to connect with a certified NRVIA inspector before making your purchase.
FREE Download: RV Inspection Checklist PDF
This checklist will help you spot signs of neglected maintenance and needed repairs while shopping for a used RV.
By submitting this form, you'll receive our newsletter and the free download. You can unsubscribe at any time.

FREE Download: RV Inspection Checklist PDF
This checklist will help you spot signs of neglected maintenance and needed repairs while shopping for a used RV.
By submitting this form, you'll receive our newsletter and the free download. You can unsubscribe at any time.